In this post I am pouring the experience gained in recent years designing and developing various projects. I have covered this topic as a speaker in a Microsoft internal event called DevDays and I would like to share with you the same findings.
When we talk about authentication and authorization, it’s easy to get confused. In order to apply a good security approach, it’s very important to understand what is under the hood of a simple login screen with two textboxes asking for username and password. Applications must use different identity technologies in different situations and developers often don’t understand security and take shortcuts.
When we develop a protected application that is not available in anonymous, we need a way to authenticate and often we need a way to call a protected resource, a protected API.
Inside this picture, MSAL plays an important role in our app.
What Is MSAL
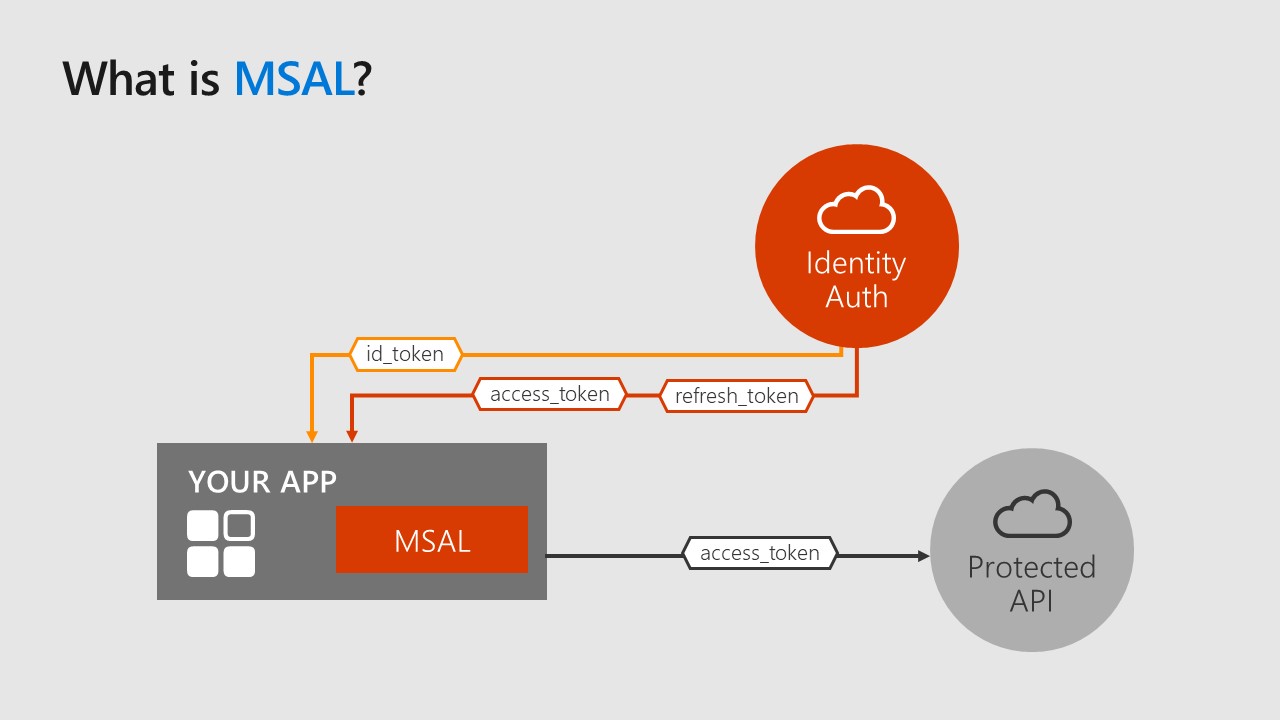
The Microsoft Authentication Library (MSAL) enables developers to acquire tokens from the Microsoft identity platform in order to authenticate users and applications, and to access secured web APIs.
Is a library used to acquire tokens, and we can use these token to access protected resources like Microsoft Graph APIs, a third party API or also a custom API.
Is very important to understand that we don’t use MSAL to secure our web applications or web API projects, but is used to access these APIs.
If we need a library that is part of Microsoft Identity Platform to protect our API, we have to use Microsoft Identity Web, that is a different library, a different package.
We can use MSAL actually in all the most common platforms and frameworks. Obviously we support .NET, both the legacy and, we can say, old .NET Framework and new .NET Core/.NET 5 ecosystem. We support JavaScript, both server side with a specific NodeJS package, and client side with a lot of different packages: plain JavaScript version can be used directly in our web pages, or if we develop a single page application, MSAL is available for React, Angular, and also for Blazor WebAssembly version. MSAL is available for Java (supporting mobile Android apps) and Python as well. And MSAL also provides a version for Objective-C platforms like macOS and iOS.
Application Categories
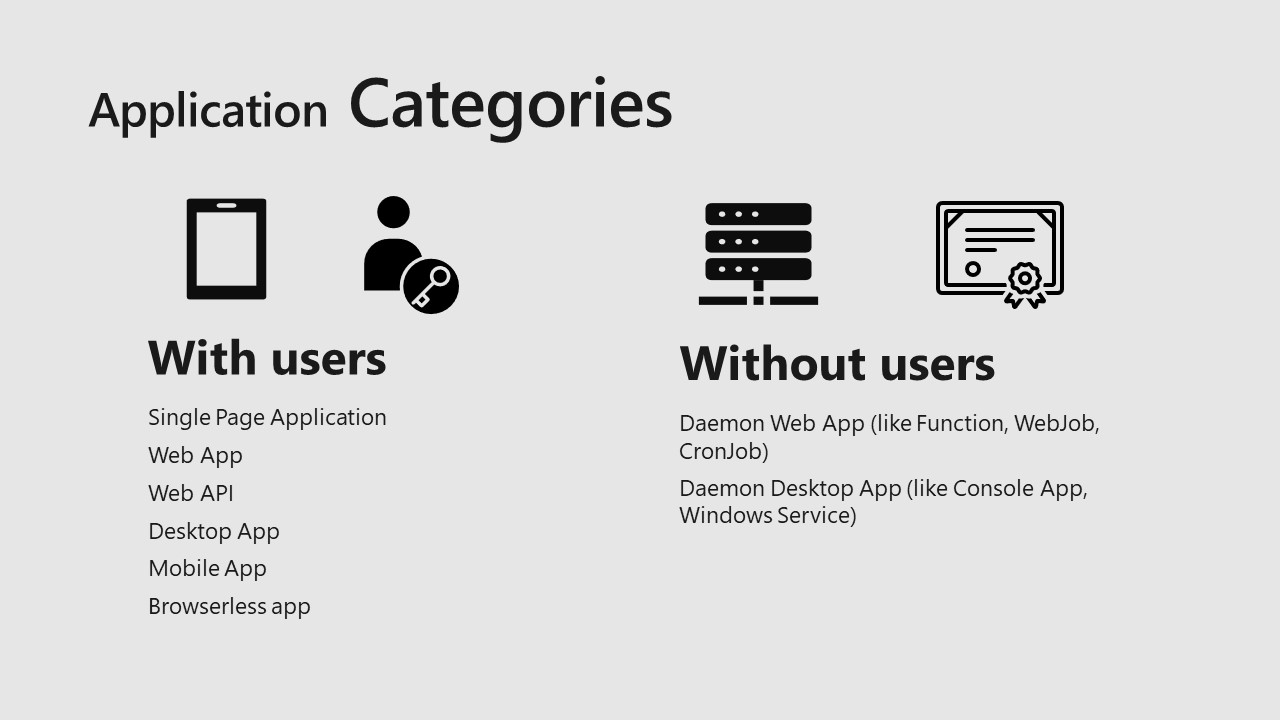
In the use of MSAL, we can consider two main application categories.
- Applications With Users, in which we have a user interface where the end-user interact and in this case we use MSAL to acquire a token for a user, to authenticate the user and give to the user access to protected resources.
- On the other hand we have Applications Without Users. In this case we acquire a token as an application and we give to the application access to protected resources
On the first category we can find all kind of applications that provides a user interface: APIs called by these user interfaces, single page applications, web applications, mobile applications and also a desktop applications (yes, there are people that are still developing desktop applications :) nowadays). Browserless apps are also becoming common: for example apps that runs on a TV or that runs on a system that cannot provide a browser to authenticate the user.
On the second category, the without users category, we are talking basically about Windows services, background jobs, web jobs, timer triggered functions, scheduled console applications, and so on. In this category we don’t have any user interaction, but the app needs to authenticate with an application context to call protected APIs.
Scenarios and Authentication Flows
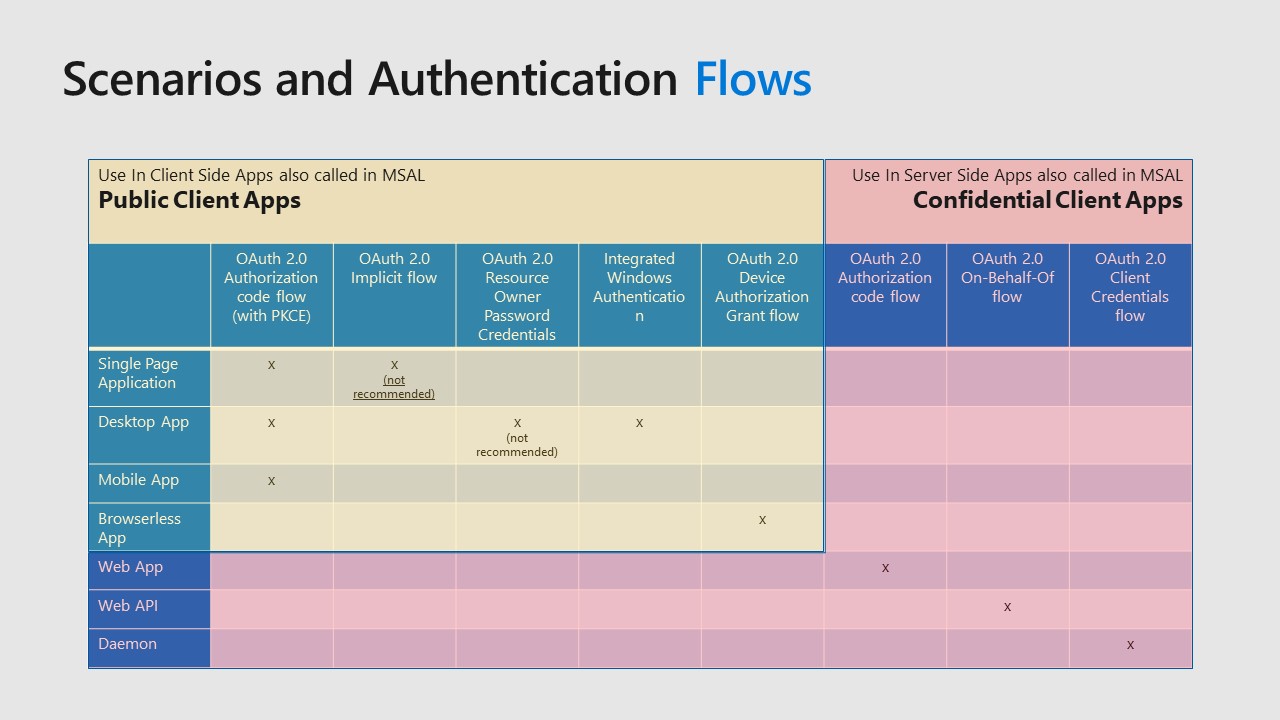
Because MSAL is used to access a protected resource, regardless of the fact that the code runs client side or server side, MSAL consider all applications as client applications, but it divides them in two types: public client apps and confidential client apps.
MSAL supports a lot of different scenarios and authentication flows and in this slide you can find the recommended mapping between the supported authentication flows and the type of applications that should use it. Why I am talking about recommendation? Because authentication flows that are mapped on public client apps are designed to avoid that the application directly handles user credentials. The only exception is the OAuth 2.0 Resource Owner Password Credentials flow that I have marked as NOT RECOMMENDED because in this flow we need from the UI of our app to ask the user his/her credentials. Then we pass credentials as input to MSAL. So in this case we are directly handling sensitive information and this should be avoided.
OAuth 2.0 Authorization code flow (with Proof Key for Code Exchange) is basically the most common flow used by all public client applications. You probably don’t even notice it, but we use this flow every time we access a protected web application. What happens is that the app redirects to Azure AD that asks our credentials and Azure AD validates our credentials and redirect back to our application with an access token that the app can use to call protected resources/API.
Apart this flows, with MSAL we can use Integrated Windows Authentication and Device Authorization Grant Flow as well for browserless app.
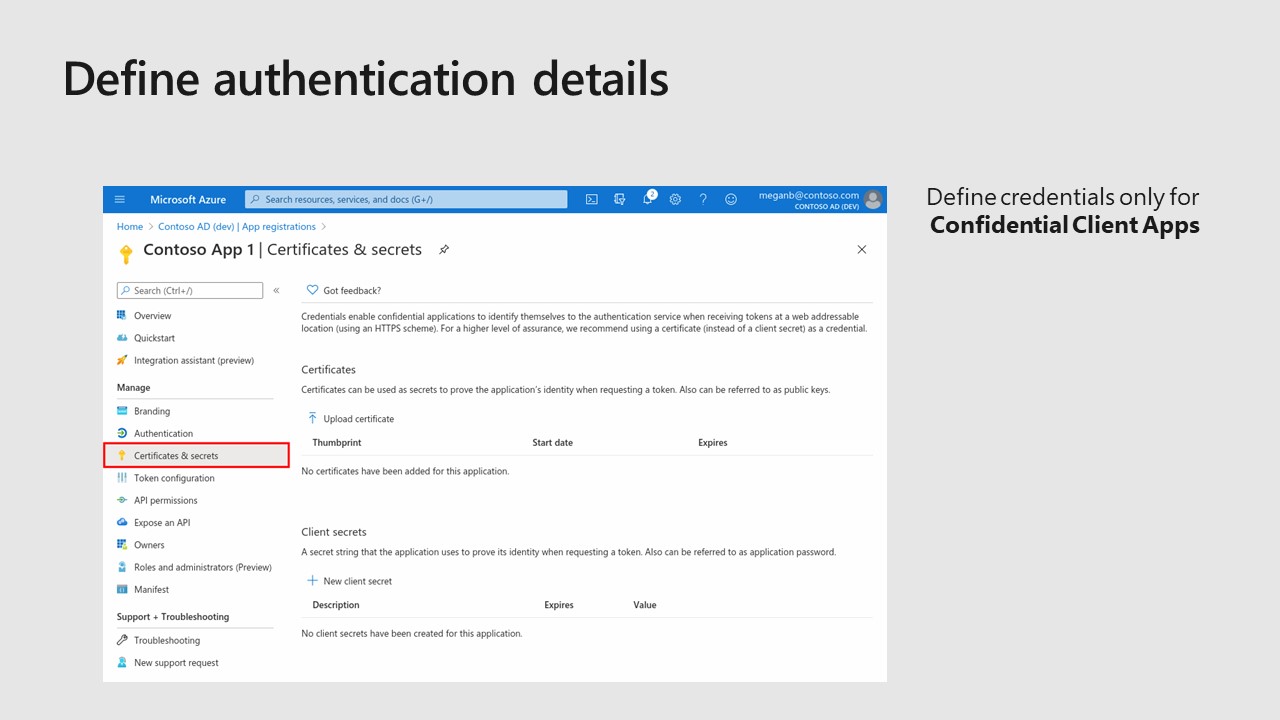
Now let’s talk about the right side, the confidential client apps. In these cases we are talking about server side applications that uses MSAL to acquire a token server side and to do it, we use authentication flows that require a secret or a certificate.
Obviously we are talking about recommendations because no one can prevent me to put the confidential client apps code inside a public app and a lot of people that don’t really know the difference between them, do it. The consequence is a bad and not secure software design, with exposed secrets and credentials that can be used maliciously.
How to use MSAL?
To use MSAL means following basically four steps:
- Register your Azure AD application
- Define authentication details
- Define permissions
- Code 😉
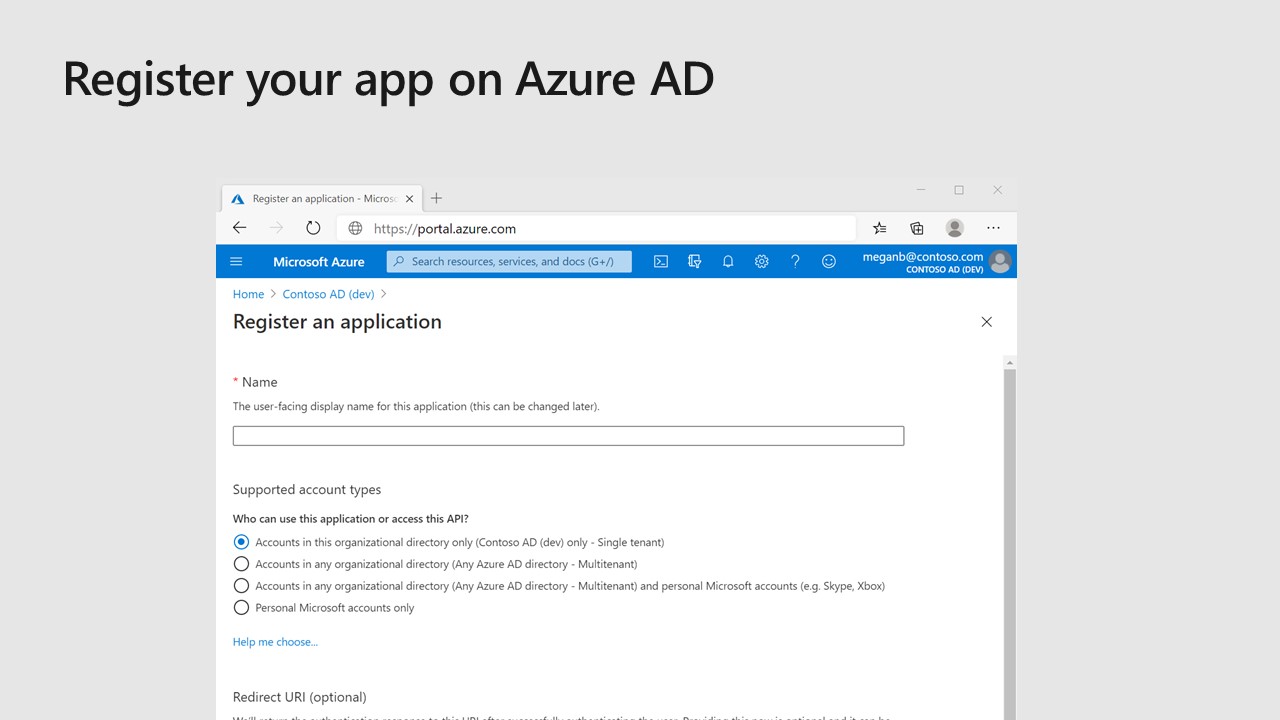
Register your Azure AD application
Just open Azure Portal, look for Azure Active Directory and open it. In the AAD page, click on “App registrations” and then “New registration”. Something simlar should appear on your screen
Define authentication details
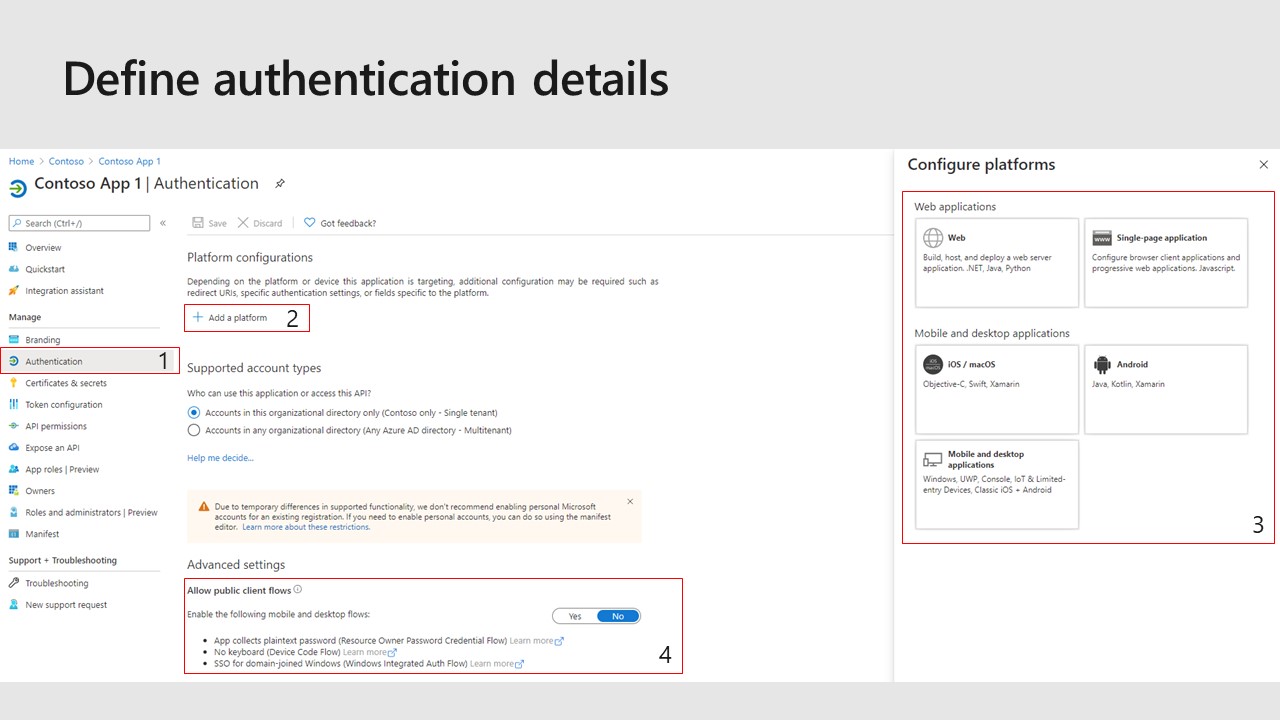
For example choosing Web platform, the OAuth 2.0 Authorization code flow will be enabled, while choosing Single Page Application platform will enable the OAuth 2.0 Authorization code with PKCE flow.
In the Advanced settings, the flag Allow public client flows will enable the app to use Resource Owner Credential Flow, Device Code Flow and Windows Integrated Auth Flow. Because the first one is the the most dangerous (because your code will handle sensitive info), don’t enable this flag if is not required by your application use cases.
Define permissions
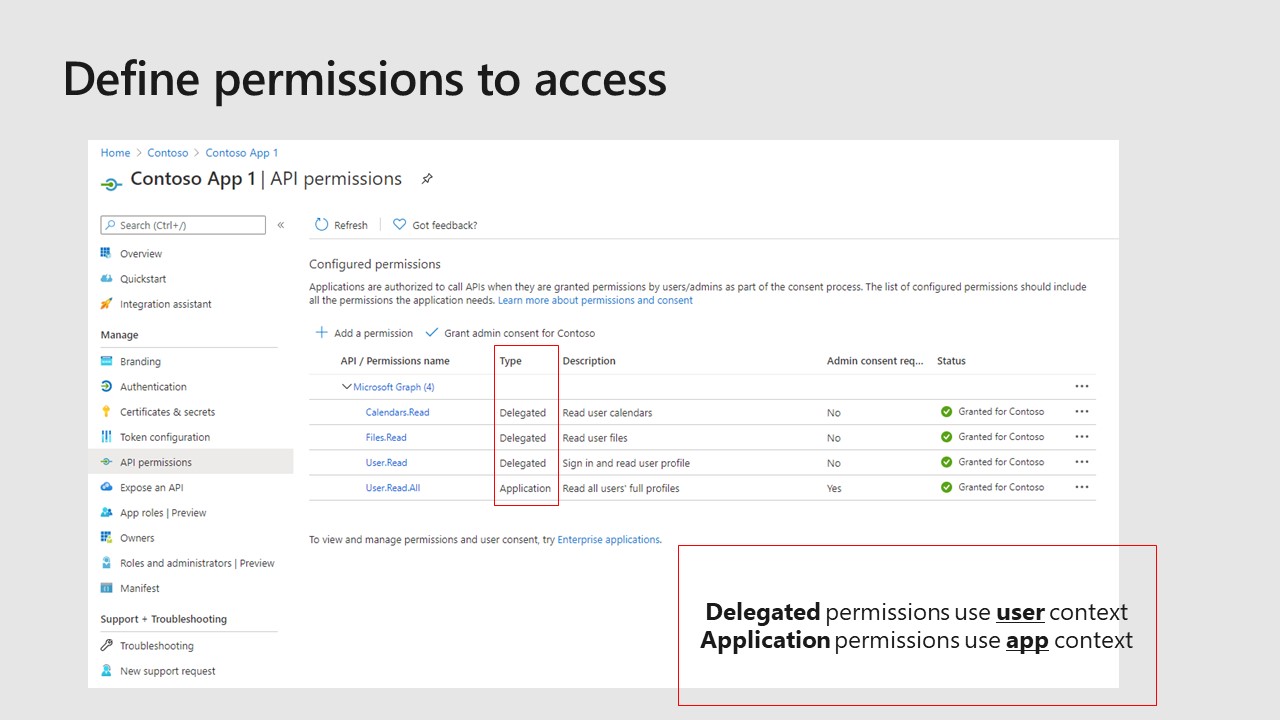
You will be able to select two types of permissions: delegated and application. The choice is closely related to the authentication model of your app. If your app uses a user context (this means that in some point in time in the authentication flow a user will sign in), then you will use delegated permissions. On the other hand, if your app is a background application (as a scheduled task or a timer triggered Azure Function) without any user interaction, then it will use application permissions.
Remember that delegated permissions, because are related to the user context, defines what your app can do acting as a user. However, if the user authenticated doesn’t have that specific permission, your app will get an unauthorized exception. The effective permissions usable by your application are an intersection between the delegated permissions defined in the app registration and the authenticated user permissions.
This behavior doesn’t apply to application permissions because in this case the application authenticates using its credentials (a secret or a certificate), so the effective permissions will be all the application permissions defined in the app registration. For this reason usually, in order to add an application permission to an app registration, the Tenant Administrator consent is required (you can see in the screenshot the “Grant admin consent for Contoso” button).
Let’s code
To use MSAL library is very easy. You have to follow basically four steps:
- Prepare configuration
- Configure an app instance object
- Acquire an access token
- Invoke the protected API
These steps are the same for all programming languages and environments supported by MSAL. The following are some examples:
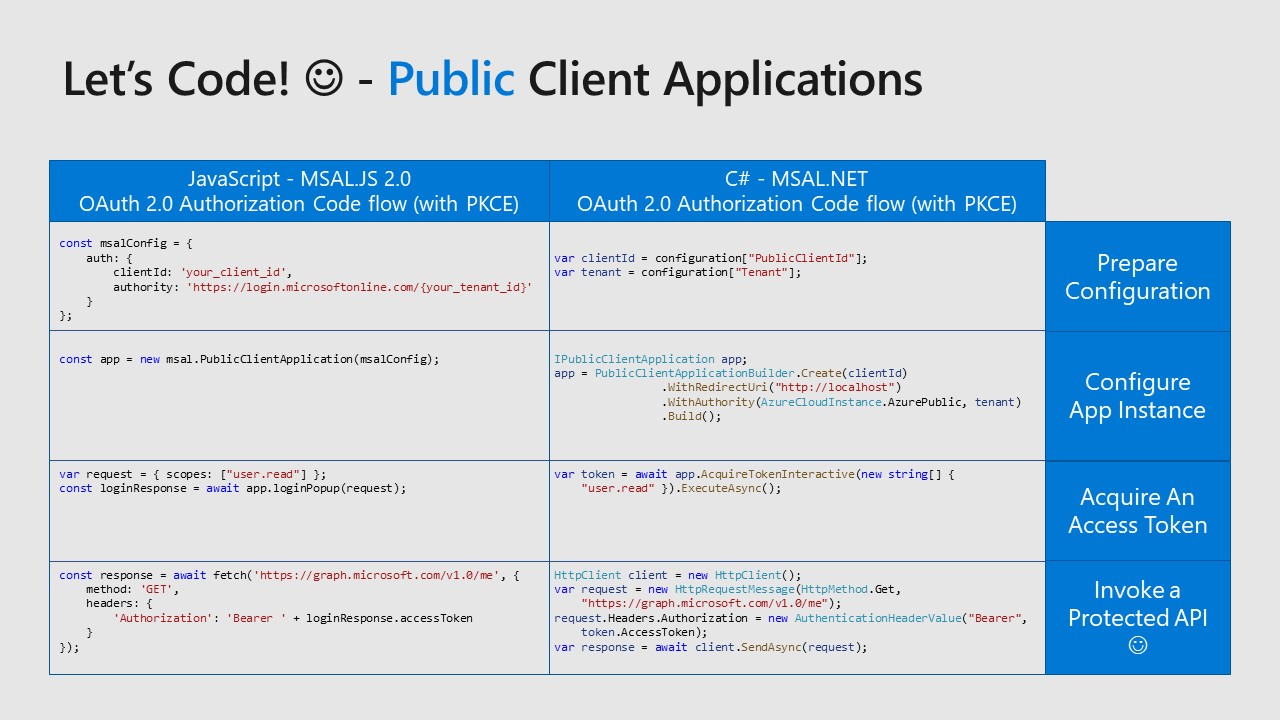
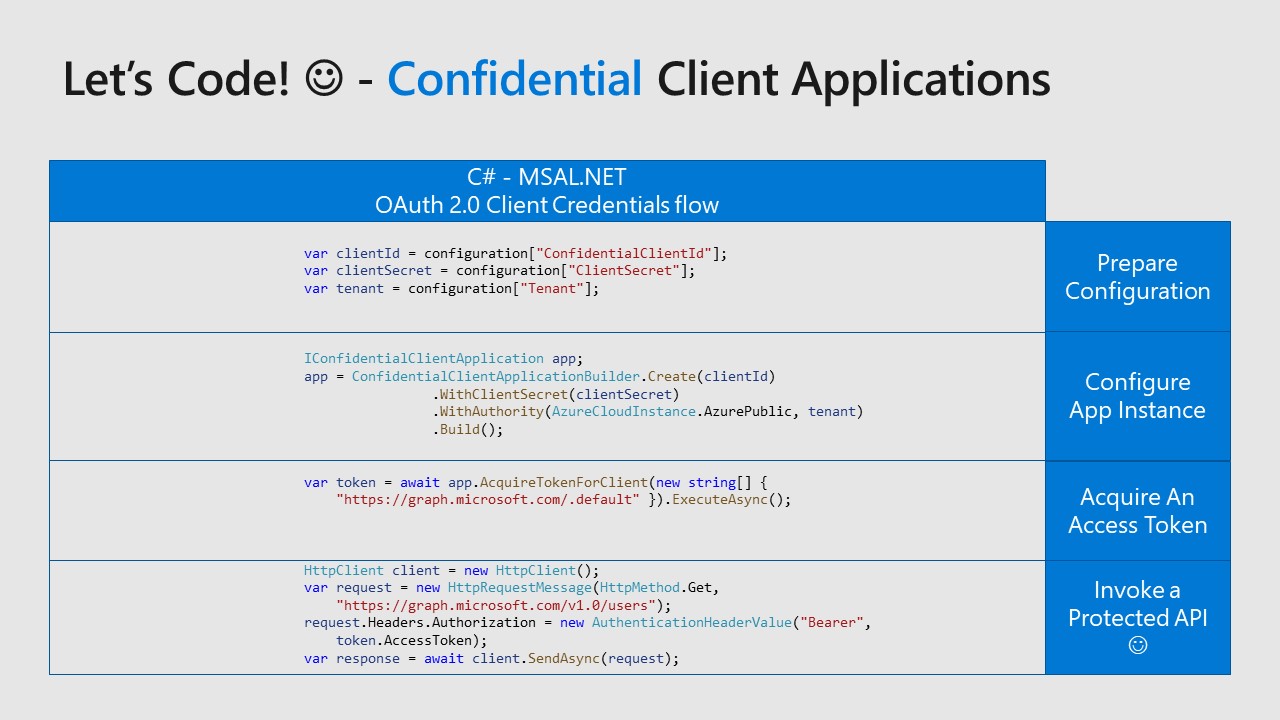
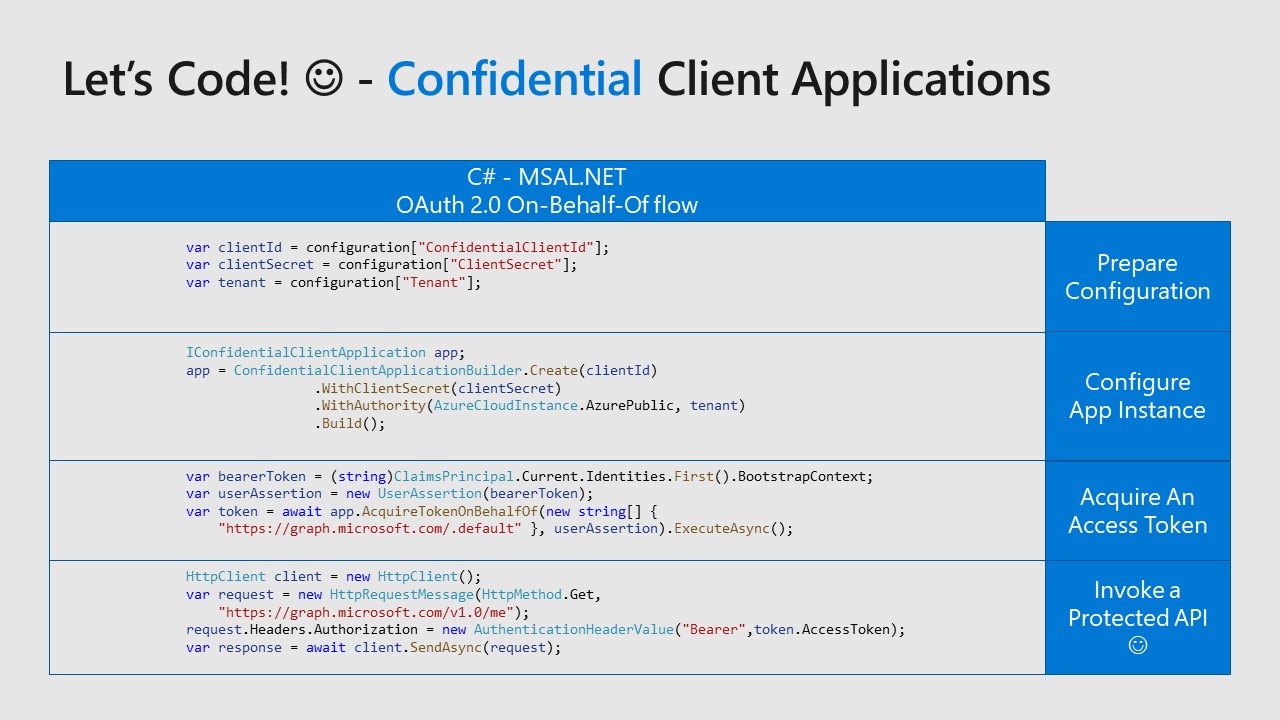
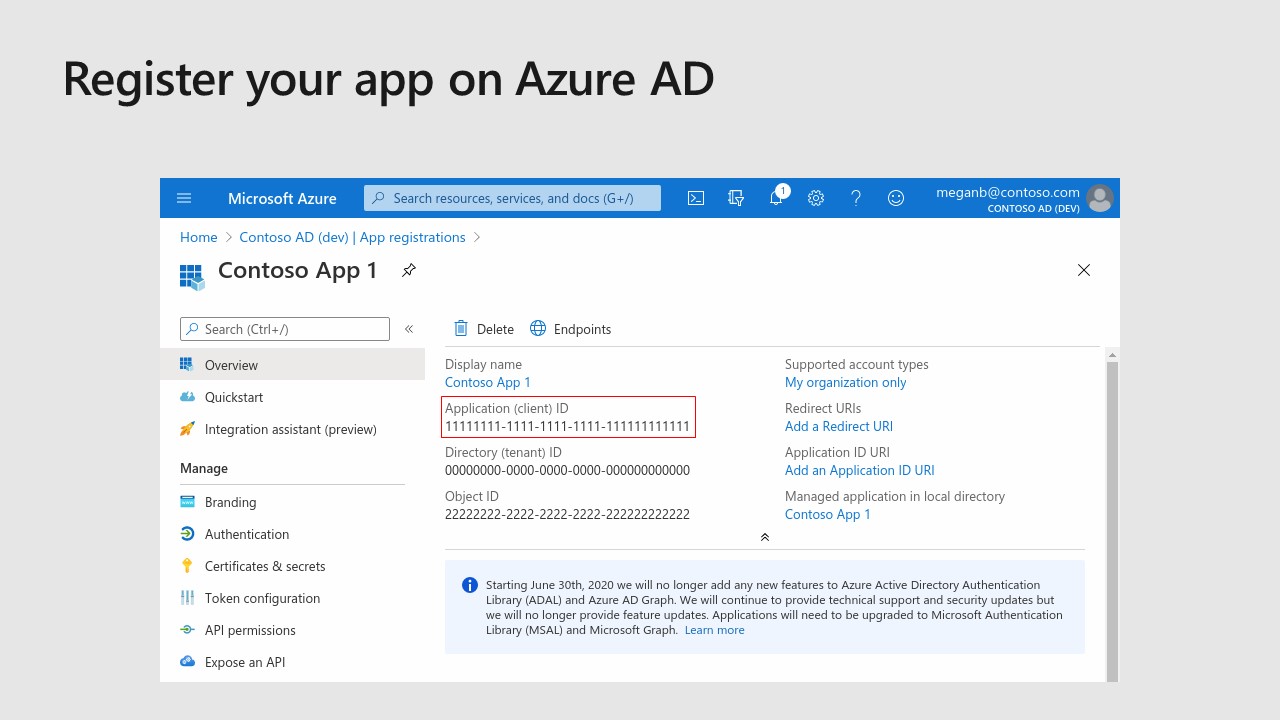
As you can see in these examples the first phase is to prepare the configuration required by MSAL. This can be easly retrieved by the overview page of the Azure AD app you have previously registered. Taking a look at these examples, consider the following notes:
- Application ID, App ID, Client ID, Confidential Client ID and Public Client ID are synonyms
- Secret and Client Secret are synonyms
- Tenant ID and Directory ID are synonyms
MSAL is simple to use and hides all the complexity about authenticating and retrieving an access token to call a protected resource (the Microsoft Graph APIs in these examples).
MSAL Features
MSAL has a lot of interesting features, but in this article I want to highlight what I think is more useful in the daily work:
- Automatic Token Lifetime Management and Token Caching
- Memory Cache is supported Out Of The Box in C#, while Session Storage and Local Storage are supported client side on JavaScript
- You can provide your cache provider implementation in order to use a different storage such as Redis, Cosmos, SQL, and so on
- Supports both Azure AD B2B and Azure AD B2C
- Supports not only Azure AD, but also ADFS 2019 (with service pack KB4490481)
MSAL vs ADAL
If you have used ADAL library, we can consider MSAL as its successor.
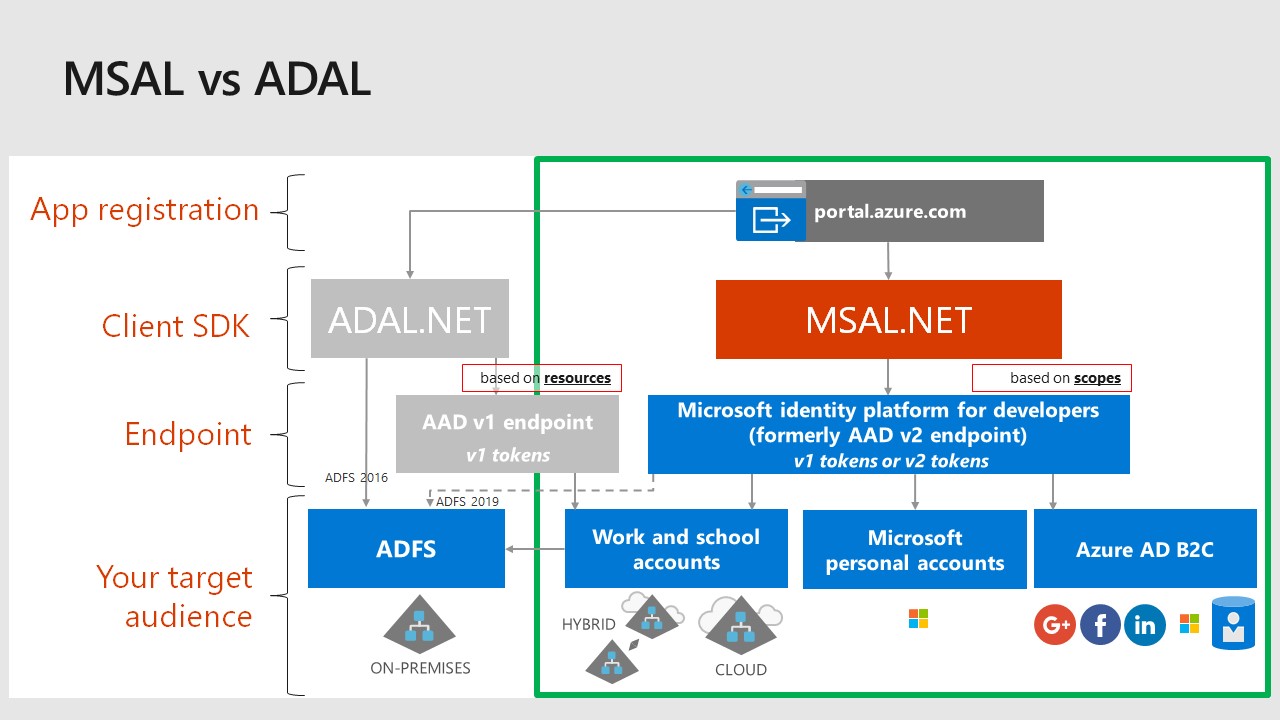
The following are the main differences between the two libraries:
- ADAL supports only Azure AD v1 endpoints and tokens, MSAL supports both v1 and v2
- ADAL supports only resources based tokens, MSAL also works with scopes based token
- Because of the first point, ADAL supports only work and school accounts, while MSAL supports Microsoft Personal accounts and Azure AD B2C as well
For more details about MSAL, please take a look at https://aka.ms/identityplatform